

Tools Required
- Phillips screwdriver
- Hand drill
- 9/64-in. drill bit
- Carpenter’s level
- Carpenter’s square
- Tape measure
- Hand saw
Materials Required
- ShadeTree ® components
- (2 to 3) 12-ft 4×4-in. wooden posts
- Ready-mix cement
- Clear silicone caulk
- Caulk gun
Before You Begin
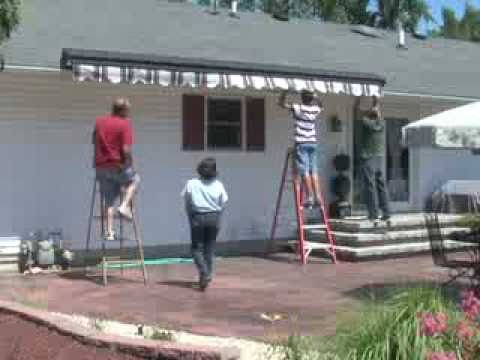
Unpack the components of the canopy unit and become familiar with the various parts and pieces of hardware. Then read through the installation instructions first for an overview of how the unit is assembled and fastened together. Then read the instructions again for the details of each step.
It’s handy to have a helper available to hold parts as the unit goes up. Have two ladders on hand, one for you and one for your helper.
Step 1 : Attach the end mounting brackets

Attach the end mounting brackets
Measure and mark the location for the end mounting brackets attached to the house. The installation instructions explain how to attach the unit to the house.
Attach the end mounting brackets
For masonry walls (brick or stone), use concrete fastening screws or lead shields. These can be purchased at any home center or lumberyard.
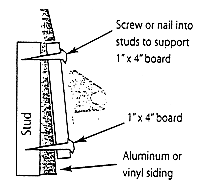
Use concrete fasteners for masonry
For stucco, aluminum or vinyl siding, it is recommended that a 1×4 board be screwed directly to the wall studs to carry the weight of the unit. On aluminum and vinyl siding, tighten the top screw close to the overlapping siding and snug up the lower screw to prevent compressing the siding.
Step 2 : Attach the extender to the end mounting brackets

Attach the extender to the end mounting brackets
Use the hardware prescribed to attach an extender to each mounting bracket. Make sure the narrow edge of the extender is facing up.
Step 3 : Place the first post base
Place the first post base
To assure a sound and level structure, it is best to set the wood posts in at least 3 feet of concrete. But you should erect the post and beams, and check the alignment before pouring the cement.
Slide a wood post into a vinyl post and then insert one end into the post base.
Then slide one of the corner brackets over the upper end of the post and move up or down until level with the extender brackets on the wall. Check that it’s level with the carpenter’s level and fasten with the hardware provided.
Step 4 : Measure the length of the projection beams
Measure the length of the projection beams
Measure the distance from the extender to the corner bracket to find out how long the projection beams should be. Have a helper hold the post assembly with the carpenter’s square while you use the carpenter’s level and measure.
Step 5 : Connect the outside projection beams
Connect the outside projection beams
Assemble the outside projection beam to the existing post assembly. Insert the arm of the corner bracket and the arm of the extender of the projection beam. Hold a carpenter’s level on the vertical post to make sure it is square with the mounting surface. Repeat to make sure the projection beam is square with the house. Then slide the post base down to the mounting surface and secure with the screws. Repeat steps 5 and 6 for the other outside projection beam.
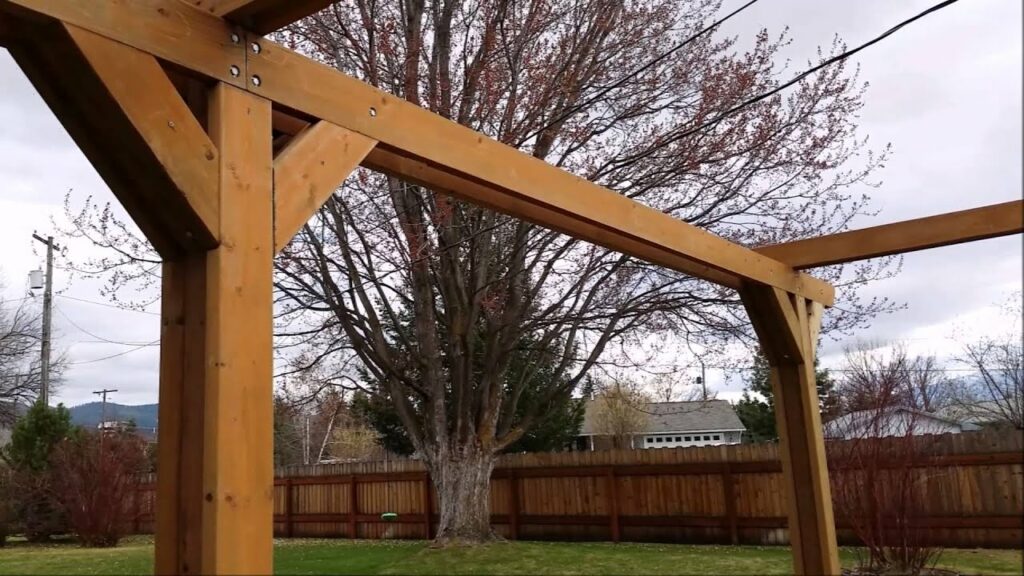
Step 6 : Connect the posts
Connect the posts
Connect the cross beam with the projection beam/post assembly. Have a helper hold one vertical post in position while you steady the second vertical post. Insert the arm on the corner brackets into the cross beams on both ends. Use the carpenter’s level to confirm that it’s level and drill holes through the mounting holes on the corner bracket and into the post. Fasten each corner with the tapping screws provided. Secure the cross beam through the pre-drilled holes on the top of the cross beam into the corner brackets at both corners. Add cement to post holes and resume assembly once the cement is dry.
Step 7 : Assemble the mid-beam brackets
Assemble the mid-beam brackets
Use the mid-beam bracket as a template and mark the mounting holes directly across from the end mounting bracket on the house. Remove the bracket and drill through one side of the cross beam and its insert. Secure the mid-beam bracket with the tapping screws provided.
Step 8 : Connect the mid-projection beam
Connect the mid-projection beam
Insert the arm of the extender and the arm of the mid-beam bracket into the mid-projection beam. Secure the beam by inserting the tapping screws provided into the beam at each end.
Step 9 : Fasten the system together
Remove the screw holding the vinyl posts up and slide the vinyl posts back down the wood posts. Make sure all are square and level using a carpenter’s level. Then fasten with the insert screws provided. Be sure to use the plastic washer on each screw so a plastic cap can be applied to cover the screw.If more than 2 inches of the post is exposed above the corner fitting you can cut the excess with a saw before assembling the post caps. Place one post cap on top of each post. To secure the cap permanently, apply a bead of clear silicone caulk to the inside wall of each cap before assembly.
Step 10 : Install the canopies
Install the canopies
Start at the end of the beams closest to the house. Insert the rollers at the ends of each cross member, then insert the front cross member first. It’s the one that has a slide lock on each end. Be sure that the canopy is oriented so that the fabric clamp is facing up, while the aluminum cross member is oriented down. Install remaining canopies in the same way.Insert the roller lock in the track at the point where you want the canopy to start and turn it 1/4 turn. Once in place, it can be secured with a set screw. The hook will hold the last cross member firmly in place. Repeat on each track.
Step 11 : Install the top lock brackets
Install the top lock brackets
Pull each canopy section out to the position where you want it to end. Place a top lock bracket on the top of the track and tighten the set screw. Test the snap-in top lock bracket and tighten or loosen it to adjust it to the proper tension setting. Snap the caps onto the screw cap washers.
Below are other related information that might interest you.