

Tools Required
- Pry bar
- Putty knife
- Measuring tape
- Square
- Hammer
- Nail set
- Level
- Hand saw
- Putty knife
- Caulk gun
- Sanding block
Materials Required
- Architectural Accents
window surround - Millwork adhesive
- Finish nails
- Spackling compound
- 220 grit sandpaper
Before You Begin
Below are the instruction steps about how to install molding.
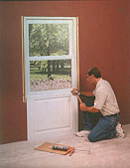
Step 1 : Prepare the window
Remove the existing molding surrounding the window called the casing. Use a pry bar and putty knife to pry the casing off the wall and window jamb. Place the putty knife between the pry bar and the wall to protect it from damage.
Drive the putty knife into the crack between the window jamb and casing. Then drive it into the crack between the putty knife and casing so the knife will protect the jamb from damage. Remove the window sill and apron under it in the same manner.
Step 2 : Install the under window panel
First, fasten the decorative window panel below the sill using millwork adhesive. Run a bead of adhesive around the perimeter of the panel and several s-shaped beads in the center of the panel. Then press the panel into place and secure it to the wall with a few finishing nails while the panel adhesive is set up. Then use a nail set to countersink the nails.
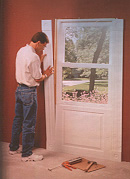
Step 3 : Measure and cut the vertical moldings
Measure and cut the vertical pieces of molding which are installed from the floor to the top of the window. The molding pieces are easily cut with a handsaw. Cut them so they are flush with the top of the window jamb. Install these pieces with adhesive and finishing nails.
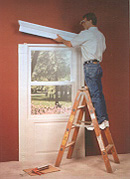
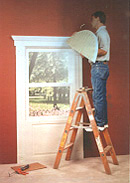
Step 4 : Install the crosshead
Complete the top of the window by gluing and nailing the crosshead into place. Make sure that this unit is centered over the window with the same overlap at each of the vertical moldings.
Step 5 : Fill in the nail holes and sand
Fill all the holes with spackling compound and let them dry. Then sand lightly using a sanding block and 220 grit sandpaper.
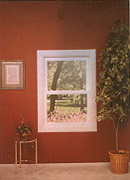
Step 6 : Decorate with paint
The window surround is ready to finish with paint.
Illustrations courtesy of Architectural Accents