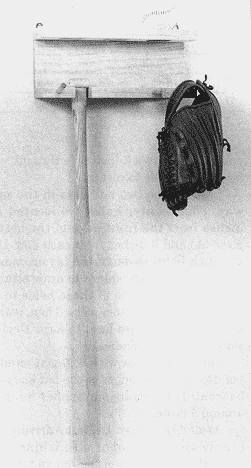
Here’s a free woodworking project plan and easy-to-follow instructions any slugger will love. It’s a bat and ball rack to keep your gear neatly stored and ready to go.
What better place to stow baseball equipment than this simple-to-build ball and bat rack? Any Little Leaguer can proudly display his or her favorite baseball gear and keep it neatly stored and out of the way. Our rack is designed for two bats and three balls, with pegs for gloves, batting helmets, or caps. It can be expanded to hold enough for a whole team.
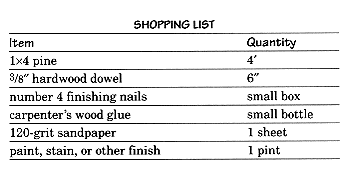
The rack is cut from 1×4 pine stock. This wood is actually 31/2 inches wide and 3/4 inch thick so all you have to do is cut the wood to length, and nail and glue it together. An inexpensive wooden miter box will help you make square cuts, but it’s not necessary.
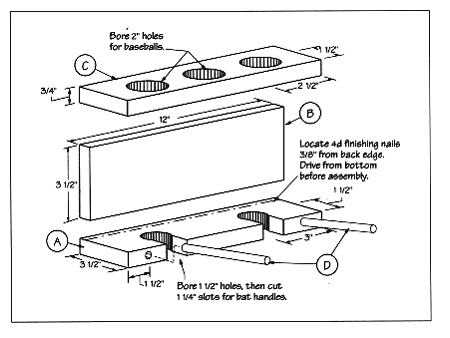
Begin construction by laying out the bottom A, back B, and top C on 1×4 stock (see Cutting List). Then cut out each piece. Next, you will drill the holes. An electric drill and hole cutter will make quick work of cutting out these large holes, but this is best left to the older carpenter. If you use a brace and expandable bit, securely clamp the parts to the table, and either carpenter can drill.

First, three holes are drilled in the top piece C to hold the baseballs. The centers of these holes are located 11/2 inches from the front edge, and 21/2 inches from each end, and a third one midway. Mark these points, and bore a 2-inch hole through each for the baseballs to rest in.

Lay out the two bat slots in the same way. Their center holes are located 11/2 inches from the front edge of the bottom piece (A) and 3 inches from each end. Drill 11/2-inch holes through the layout marks. Use a combination square to draw straight lines from the edges of these holes to the front edge of the bottom piece. Then, using a saw, cut inside these lines to form 11/4-inch slots for the bat handles.
Sand the pieces with 120-grit sandpaper. Round off all edges of the bat slots and baseball holes using sandpaper wrapped around a dowel.
Assembly is easy. Begin by driving four evenly spaced number 4 finishing nails along the back edges of the top and bottom. Drive them through the pieces until just the tip protrudes from the other side. Next, run a bead of glue down the top edge of the back piece (B). Then, while one member holds the back straight to keep edges aligned, the other nails on the top. Now turn the rack over, and glue and nail the bottom to the back following the same procedure.

For the glove and hat pegs, drill two 3/8- inch holes in the front edge of the bottom piece 11/2 inches from each end. Drill these holes angling downward so that the dowels, when inserted, will slant upward and prevent your hat and glove from slipping off. Use an adjustable bevel set at a slight angle (5 degrees) to act as a guide. If you don’t have a bevel, cut a piece of cardboard to a 5- degree angle, and use it as a guide.
Turn your rack on its back, put a drop of glue in each dowel hole, and tap in 3/8-inch dowels (D). Set the whole works aside for the glue to dry.
Allow the glue to dry overnight, then use a nail set to sink the heads of the finishing nails below the wood surface. Scrape off any excess glue with a chisel, and give the rack a final sanding. Then it’s ready to stain, paint, or varnish.
You can attach your rack to a wall with plastic wall anchors. If you have built a rack with a larger capacity, use expansion-type fasteners. We used large picture-hanging brackets and finishing nails driven into the lath of a plaster wall. If your walls are drywall, use plastic wall anchors. Tighten the anchor screws until their heads are 1/8 inch from the wall surface, then hook the picture brackets over the screw heads.
TIME REQUIRED Four hours for cutting, building, and assembling, plus drying time for glue and finish.
Here are some other guides that might interest you:
